Crispy, garlicky, Parmesan-coated chicken tenders baked (not fried) for an easy dinner that feels like a treat.
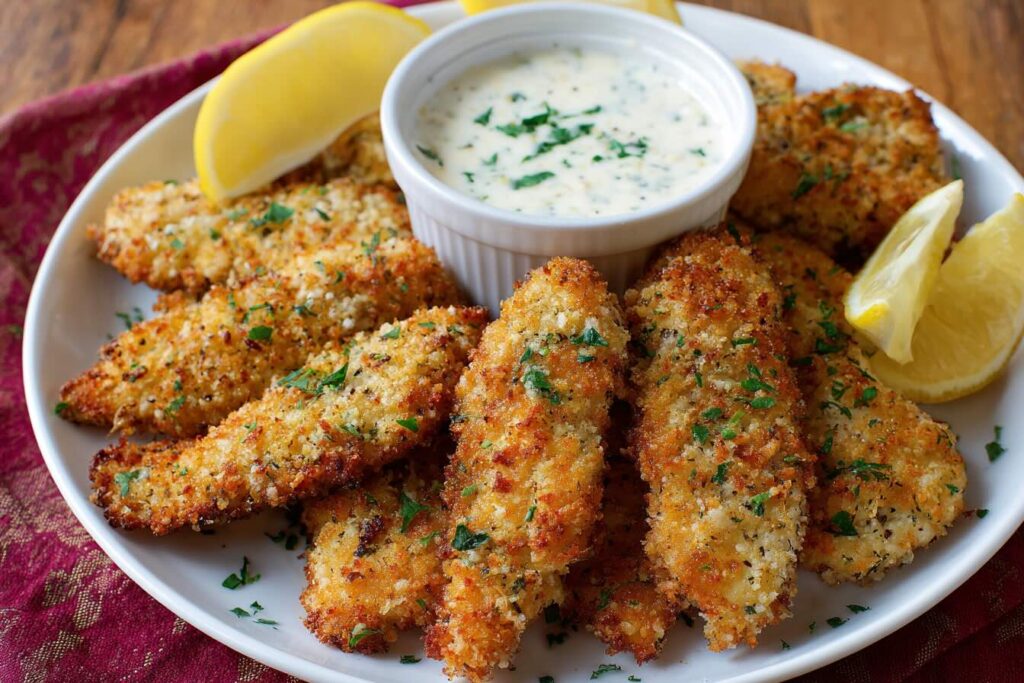
Some nights you want that crunchy, dippable, everyone’s-happy kind of dinner, but you do not want to stand over hot oil or deal with splatters. That’s exactly where these Baked Garlic Parmesan Chicken Tenders come in. They deliver the golden, crisp edges you crave, with a savory garlic-Parmesan bite that tastes like cozy comfort food.
These tenders are simple: chicken gets a quick dip, then a generous coat of seasoned breadcrumbs and Parmesan, and into a hot oven they go. Baking at a higher temperature helps the coating set fast, so you get that satisfying crunch without deep frying. The flavor profile is classic American-Italian inspired: salty Parmesan, mellow garlic, and a little paprika warmth, finished with a sprinkle of parsley if you’re feeling fancy.
I love recipes like this because they solve a very real problem: you need something reliable for busy nights that still feels fun. Kids love the “finger food” factor, adults love that it pairs with almost anything, and you can scale it up easily for game day or meal prep. Plus, it’s one of those meals that makes the kitchen smell incredible in the best way.
Why you’ll love it:
- Oven-baked crispiness with no frying mess
- Big flavor from garlic, Parmesan, and pantry seasonings
- Fast and flexible for weeknights, parties, or meal prep
- Great for dipping with sauces you already have
- Easy to customize for spicy, gluten-free, or dairy-light needs
Ingredients
Chicken
- 1 1/2 lb chicken tenders (about 680 g), patted dry
- If using breasts: slice 2 large breasts into strips
Dredge and coating
- 2 large eggs
- 1 tbsp Dijon mustard (optional)
- 1 1/2 cups panko breadcrumbs (about 90 g)
- 3/4 cup finely grated Parmesan (about 75 g)
- 1 1/2 tsp garlic powder
- 1 tsp Italian seasoning
- 1/2 tsp paprika
- 3/4 tsp kosher salt
- 1/2 tsp black pepper
For crisping
- 2 tbsp melted butter (28 g) or 2 tbsp olive oil (30 ml)
- Cooking spray works too (optional)
To finish
- 1 tbsp chopped parsley (optional)
- Lemon wedges (optional)
💡 Shopping tip: Grab finely grated Parmesan (the sand-like kind) for better coating coverage and stronger flavor in every bite.
Step-by-Step Instructions
- Preheat and prep (5 min): Heat oven to 425°F (220°C). Line a baking sheet with foil for easy cleanup and set a wire rack on top if you have one. Lightly grease the rack or sheet.
- Mix the coating (3 min): In a shallow bowl, stir together panko, Parmesan, garlic powder, Italian seasoning, paprika, salt, and pepper until evenly combined.
- Whisk the dip (1 min): In a second bowl, whisk eggs with Dijon (if using) until smooth and a little frothy.
- Coat the chicken (8 to 10 min): Dip each tender in the egg mixture, let excess drip off, then press into the breadcrumb mix. You want a thick, even layer. Place on the rack or sheet with space between pieces.
- Add fat for crisping (1 min): Drizzle melted butter or olive oil over the tenders (or mist with cooking spray). This helps browning and crunch.
- Bake (16 to 20 min): Bake for 10 minutes, then flip. Bake 6 to 10 minutes more until deeply golden and the thickest piece hits 165°F (74°C). Coating should look dry and crisp, not pale.
- Optional extra color (1 to 2 min): If you want more browning, broil on high briefly, watching closely.
- Finish and serve (1 min): Sprinkle with parsley and serve with lemon wedges and your favorite dipping sauce.
💡 Tip: For the crispiest coating, pat the chicken very dry and bake on a wire rack so hot air can circulate underneath.
Variations & Substitutions
- Gluten-free: Swap panko for gluten-free breadcrumbs or crushed gluten-free cornflakes.
- Dairy-light: Use dairy-free Parmesan-style shreds or reduce Parmesan and add 1 tsp nutritional yeast for a savory boost.
Make-Ahead, Storage & Reheating
- Make-ahead: Bread the tenders and refrigerate on a tray (covered) for up to 8 hours before baking.
- Storage: Refrigerate leftovers 3 to 4 days in an airtight container.
- Freezing: Freeze cooked tenders on a sheet pan until solid, then bag for up to 2 months.
- Reheat: Bake at 400°F (205°C) for 8 to 12 minutes (from fridge) or 15 to 18 minutes (from frozen) until hot and crisp.
Nutritional Info (Estimated, per serving)
(Assumes 4 servings)
- Calories: ~420
- Protein: ~36 g
- Carbs: ~22 g
- Fat: ~20 g
💡 Note: Estimates vary by brands and portions.
Serving Suggestions
- Classic: ketchup, ranch, honey mustard, or BBQ sauce
- Bright: lemon-garlic yogurt dip or tzatziki-style sauce
- Sides: oven fries, sweet potato wedges, or roasted broccoli
- Fresh: simple Caesar salad or crunchy slaw
- Cozy: buttery noodles or mac and cheese
- Garnish: extra Parmesan, parsley, and a squeeze of lemon
Recipe FAQs
Can I use chicken breasts instead of tenders?
Yes. Slice breasts into even strips so they cook at the same speed, then bake as written.
Do I need a wire rack?
No, but it helps. Without one, flip carefully and make sure the tenders are spaced out so they roast instead of steam.
Can I freeze these?
Absolutely. Freeze cooked tenders, then reheat from frozen at 400°F (205°C) until hot and crisp.
Can I make them spicy?
Add 1/4 to 1/2 tsp cayenne to the breadcrumb mix, or serve with hot honey or spicy mayo.
Can I air fry them instead?
Yes. Air fry at 400°F (205°C) for 10 to 12 minutes, flipping halfway, until 165°F (74°C).
Why is my coating not crispy?
Common causes: chicken was wet, oven temp too low, pieces too close together, or not enough fat on the coating. Pat dry, space them out, and drizzle butter or oil for best browning.
Final Notes
If you’re looking for a dinner that checks the “easy, crispy, and actually flavorful” boxes, these baked garlic Parmesan chicken tenders are a keeper. They’re the kind of recipe you can memorize after one try: quick dredge, big seasoning, hot oven, done. I also love how well they fit into real life, whether that’s a weeknight with homework happening at the counter or a casual hangout where you want something snacky but still homemade.
If you make them, tell me what you dipped them in, because the sauce debate is half the fun. Did you go classic ranch, bright lemony yogurt, or something spicy? And if you tweak the seasoning blend, I’d love to hear what worked for you so other readers can try it too. Share a photo, leave a comment, and save this one for the next time you want comfort food without the fryer.