Creamy, sweet-salty peanut butter fudge that sets up perfectly in the fridge with minimal effort.
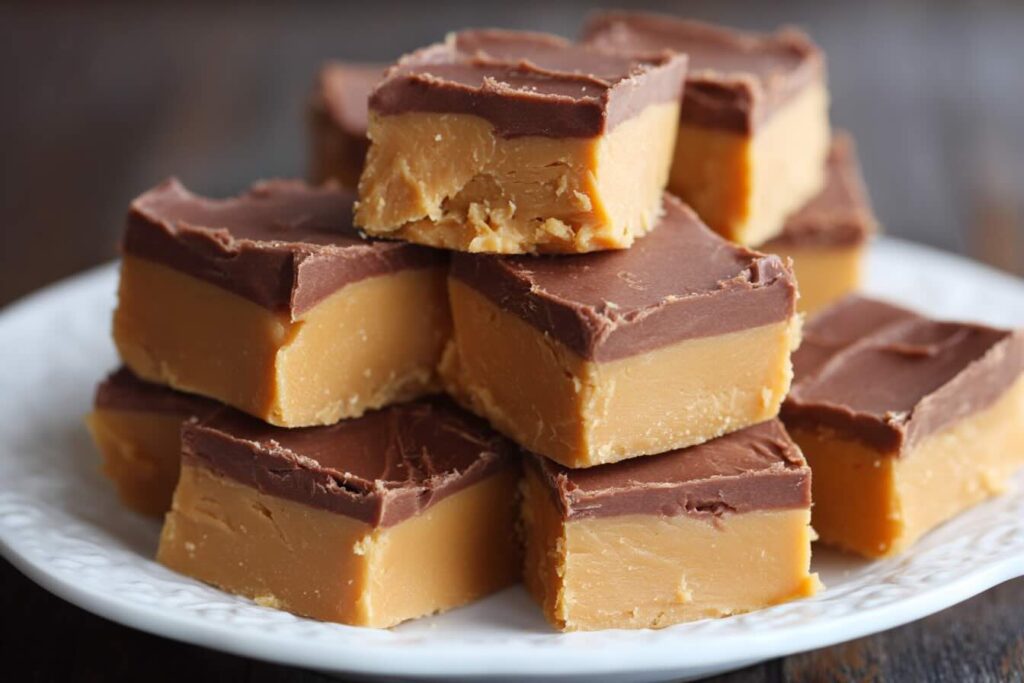
If you have ever wanted a homemade candy that feels festive but behaves like a weeknight recipe, this is it. Easy peanut butter fudge is the kind of treat you can pull together while the kettle boils, then forget about until it is firm, sliceable, and ready to share. It is rich without being fussy, and it hits that nostalgic peanut butter flavor that tastes like childhood bake sales and holiday tins.
This version is no-bake and made with pantry staples, which means you do not need a candy thermometer or any special skills. The base melts together quickly (microwave or stovetop), then you chill it until it turns into smooth, creamy squares. The texture is dense and velvety, not crumbly, with a gentle sweetness that is balanced by a pinch of salt.
I also love this recipe when I need something dependable for gifting. Fudge travels well, looks polished with almost no styling effort, and makes a small batch that feels generous. Bring it to a potluck, tuck it into lunchboxes, or keep a few pieces in the freezer for late-night sweet cravings.
Why you’ll love it
- Fast and low-stress: about 10 minutes of hands-on time.
- No thermometer needed: the fridge does the hard work.
- Ultra creamy: white chocolate helps it set with a silky bite.
- Great for gifting: clean slices and sturdy texture.
- Easy to customize: add crunch, swirl chocolate, or make it dairy-free.
Ingredients
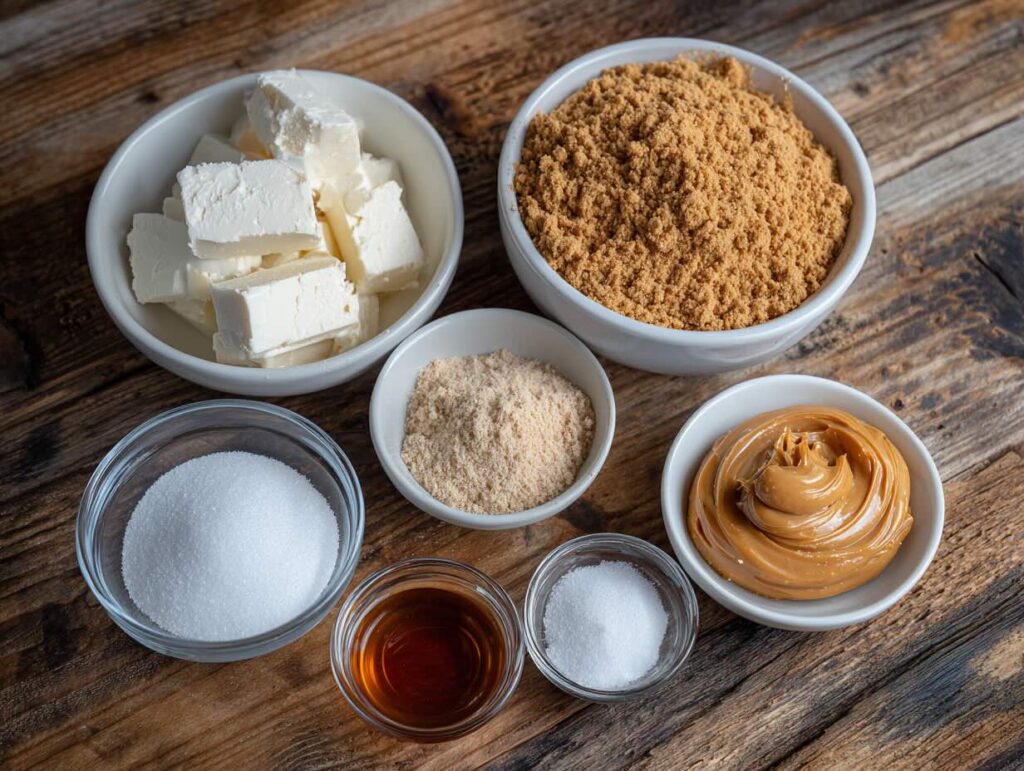
- Creamy peanut butter: 1 cup (260 g)
- Sweetened condensed milk: 1 can, 14 oz (396 g)
- White chocolate chips: 2 cups (about 340 g)
- Unsalted butter: 2 tbsp (28 g)
- Vanilla extract: 1 tsp (5 mL)
- Fine salt: 1/4 tsp (about 1.5 g)
- Optional toppings: flaky salt, chopped roasted peanuts, or mini chocolate chips
💡 Shopping tip: For the smoothest melt, grab a name-brand white chocolate chip (or white baking chips) that lists cocoa butter, since some budget chips can seize or stay waxy.
Step-by-Step Instructions
- Prep the pan (2 minutes): Line an 8-inch square pan (20 cm) with parchment, leaving overhang on two sides for easy lifting.
- Melt the base (3 to 5 minutes): In a microwave-safe bowl, combine white chocolate chips, sweetened condensed milk, and butter. Microwave in 20-second bursts, stirring well each time, until mostly melted and glossy. (You can also melt gently over a double boiler.)
- Stir in peanut butter (1 minute): Add peanut butter, vanilla, and salt. Stir until completely smooth and uniform, with no streaks. The mixture should look thick and shiny.
- Pan it (2 minutes): Scrape into the prepared pan and smooth the top with a spatula. Tap the pan lightly on the counter to level. Add toppings if you like.
- Chill to set (2 hours): Refrigerate until firm all the way through.
- Slice and serve (5 minutes): Lift out using parchment, place on a cutting board, and cut into 16 squares. Wipe the knife between cuts for the cleanest edges.
💡 Tip: If the mixture looks too thick to spread, warm it for 10 to 15 seconds and stir again, or lightly grease your spatula to smooth the top.
Variations & Substitutions
- Dairy-free: Use dairy-free white chips and sweetened condensed coconut milk; chill a little longer for a firm set.
- Nut-free: Swap peanut butter for sunflower seed butter (expect a slightly earthier flavor and a darker color).
Make-Ahead, Storage & Reheating
- Make-ahead: Make up to 1 week ahead; it slices best once fully chilled.
- Storage: Refrigerate up to 10 days in an airtight container, with parchment between layers.
- Freezing: Freeze up to 2 months, tightly wrapped; thaw in the fridge overnight.
- Reheat: Not needed, but for softer fudge let it sit at room temp 10 to 15 minutes before serving.
Nutritional Info (Estimated, per serving)
- Calories: ~300
- Protein: ~7 g
- Carbs: ~29 g
- Fat: ~18 g
💡 Note: Estimates vary by brands and portions.
Serving Suggestions
- Serve with hot coffee, espresso, or strong black tea.
- Add to a holiday cookie platter with shortbread and truffles.
- Crumble over vanilla ice cream or frozen yogurt.
- Pair with salty snacks like pretzels or popcorn for contrast.
- Wrap squares in parchment and tie with twine for easy gifts.
Recipe FAQs
Can I freeze peanut butter fudge?
Yes. Freeze in an airtight container with parchment between layers for up to 2 months, then thaw in the fridge for best texture.
Do I have to use white chocolate chips?
They help the fudge set smoothly. If you swap in regular chocolate chips, the flavor becomes more like peanut butter chocolate fudge and the set can be slightly softer.
Can I use natural peanut butter?
It can work, but separation makes results less reliable. If you use it, stir extremely well and expect a softer fudge; chilling longer helps.
Why is my fudge grainy?
This usually happens if the chocolate overheats or scorches. Melt in short bursts, stir often, and stop heating when it is mostly melted so residual heat finishes the job.
What pan size should I use if I don’t have an 8-inch square?
A 9-inch square pan works, but the fudge will be thinner and may set faster. A loaf pan will make thicker pieces and may need extra chill time.
Final Notes
This easy peanut butter fudge is my go-to when I want something that tastes like I spent all afternoon in the kitchen, but I actually just stirred a bowl and let the fridge handle the rest. Keep it classic and creamy, or dress it up with flaky salt and chopped peanuts for that sweet-salty crunch that makes you reach for “just one more” piece.
If you make it for a party, slice it small. Fudge is rich, and bite-size squares disappear fast on dessert tables. If you are gifting, tuck a few pieces into a tin with parchment between layers and store it chilled until you are ready to hand it off.
If you try a fun twist (like a chocolate swirl or a crunchy topping), I would love to hear what you did. Drop a comment with your variation, and if you share it, tag your photo so other readers can get inspired too.