Bright, glossy, and crunchy in under an hour.
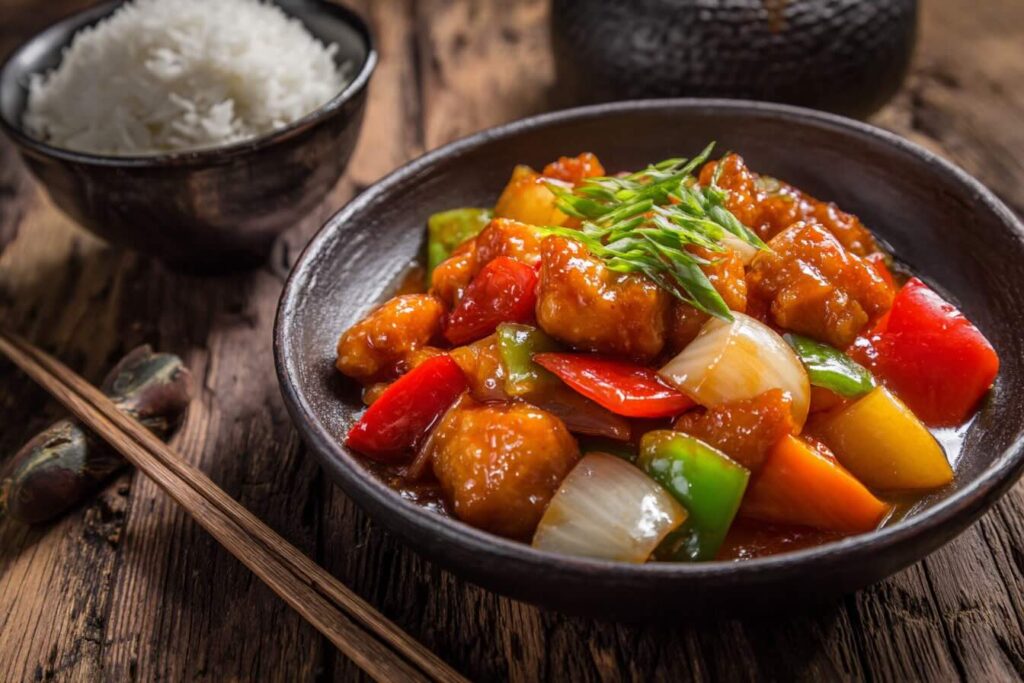
Sweet and sour chicken is one of those comforting restaurant classics that somehow feels celebratory even on a random weeknight. The glossy red-orange sauce, the punch of vinegar, the little bursts of pineapple, and the crisp chicken all hit that happy balance of cozy and craveable. If you’ve ever wished your homemade version had that true takeout crunch and that bold, tangy-sweet flavor, this recipe is for you.
This dish is inspired by the familiar Chinese takeout style that many of us grew up with. It’s not trying to replicate any single regional tradition, but it does honor the spirit of the sweet, tangy, and vibrant profile that made the dish so popular. The sauce is balanced and bright, the chicken stays crispy longer than most homemade versions, and the veggies keep the whole thing feeling fresh.
The best part is how practical it is. You don’t need a deep fryer or hard-to-find ingredients, and the steps are straightforward even if you don’t fry often. The batter is light with a little cornstarch magic, giving you a crisp shell that stands up to sauce without turning soggy too fast. You can also control the sweetness and tang to match your own takeout nostalgia.
Why you’ll love it
- Crispy, not soggy: A simple batter technique helps the chicken stay crunchy.
- Balanced sauce: Sweet, tart, and savory with easy pantry staples.
- Weeknight-friendly: Fast prep and a quick cook time.
- Family favorite: Familiar flavors that are easy to adjust for kids and adults.
- Flexible: Works with pantry swaps and can be lightened up if you want.
Ingredients
Chicken
- 1 1/2 lb boneless skinless chicken breast or thighs, cut into 1-inch pieces (680 g)
- 1 tsp kosher salt (5 g)
- 1/2 tsp white pepper or black pepper (1 g)
- 1 tsp soy sauce (5 ml)
Light crispy batter
- 1 large egg
- 1/2 cup cornstarch (60 g)
- 1/2 cup all-purpose flour (60 g)
- 1 tsp baking powder
- 1/2 tsp salt
- 1/2 cup cold water, plus more as needed (120 ml)
Sweet and sour sauce
- 1/2 cup ketchup (120 g)
- 1/3 cup rice vinegar (80 ml)
- 1/4 cup sugar (50 g)
- 2 tbsp soy sauce (30 ml)
- 1/2 cup pineapple juice (120 ml)
- 1 tbsp cornstarch (8 g)
- 2 tbsp water (30 ml)
Stir-fry add-ins
- 1 tbsp neutral oil (15 ml)
- 1 red bell pepper, chunked
- 1 green bell pepper, chunked (optional)
- 1 small onion, chunked
- 1 cup pineapple chunks, fresh or canned, drained (165 g)
For frying
- 3 to 4 cups neutral oil like canola or peanut (720 to 960 ml)
💡 Shopping tip: If buying canned pineapple, grab one packed in juice, not syrup. The juice doubles as a perfect shortcut for the sauce.
Step-by-Step Instructions
- Season the chicken (5 minutes). Toss chicken with salt, pepper, and 1 tsp soy sauce. Let it sit while you prep the batter and sauce.
- Mix the sauce (5 minutes). In a bowl, whisk ketchup, rice vinegar, sugar, soy sauce, and pineapple juice. In a small cup, stir cornstarch with water to make a slurry.
- Prep the veggies (5 minutes). Cut peppers and onion into bite-size chunks. Set aside with pineapple.
- Make the batter (3 minutes). Whisk egg, cornstarch, flour, baking powder, and salt. Add cold water and whisk until it looks like a thin pancake batter that coats a spoon.
- Heat the oil (8 to 10 minutes). In a heavy pot, heat 1 to 2 inches of oil to 350°F/175°C.
- Coat the chicken (2 minutes). Add chicken to the batter and stir until evenly coated.
- Fry in batches (8 to 10 minutes). Carefully drop in pieces, leaving space between them. Fry 4 to 5 minutes, turning once, until golden and crisp. Transfer to a rack.
- Double-crisp for extra crunch (optional, 3 to 4 minutes). Increase heat slightly to 365°F/185°C and fry the chicken again for 1 to 2 minutes. This adds serious takeout-style texture.
- Cook the sauce (3 to 4 minutes). In a large skillet or wok over medium heat, pour in the sauce mixture. Bring to a simmer, then whisk in the cornstarch slurry. Cook until glossy and thick enough to coat a spoon.
- Stir-fry the veggies (3 to 4 minutes). In a separate pan or the same wok after sauce thickens, heat 1 tbsp oil. Cook onion and peppers 2 to 3 minutes until bright and slightly tender.
- Combine (1 minute). Add pineapple and fried chicken to the wok. Pour over the thickened sauce and toss quickly to coat. Remove from heat while the chicken still looks crisp around the edges.
- Check doneness. Chicken should be 165°F/74°C inside, with a crunchy golden coating.
💡 Tip: Want maximum crunch? Keep the chicken and sauce separate until right before serving, then toss for just 30 to 60 seconds.
Variations & Substitutions
- Gluten-free: Use tamari instead of soy sauce and replace all-purpose flour with a gluten-free blend plus cornstarch.
- Lighter, less fried: Air-fry battered chicken at 400°F/205°C for 10 to 14 minutes, flipping halfway, then toss with sauce.
Make-Ahead, Storage & Reheating
- Make-ahead: Mix the sauce up to 3 days ahead and store refrigerated. Chop veggies 1 day ahead.
- Storage: Refrigerate leftovers in an airtight container for up to 3 days.
- Freezing: Freeze fried chicken without sauce for up to 2 months. Thaw overnight in the fridge.
- Reheat: Re-crisp chicken in the oven at 400°F/205°C for 8 to 12 minutes or air fryer for 5 to 7 minutes, then toss with warmed sauce.
Nutritional Info (Estimated, per serving)
- Calories: ~520
- Protein: ~32 g
- Carbs: ~55 g
- Fat: ~20 g
💡 Note: Estimates vary by brands and portions.
Serving Suggestions
- Steamed jasmine rice or basmati rice
- Fried rice with peas and scallions
- Stir-fried broccoli or bok choy
- Sesame cucumber salad
- Extra pineapple or sliced scallions on top
- A drizzle of chili oil or a side of chili crisp for heat
Recipe FAQs
Can I use chicken thighs instead of breast?
Yes. Thighs stay extra juicy and are very forgiving if you slightly overcook.
How do I keep the coating crispy?
Use a wire rack after frying, avoid overcrowding the oil, and toss with sauce right before serving.
Can I bake this instead of frying?
You can. Coat chicken in cornstarch-flour mixture, spray with oil, and bake at 425°F/220°C for 18 to 22 minutes, flipping once. It won’t be as crisp as frying but still tasty.
Is this dish spicy?
Not at all. Add 1 to 2 tsp sriracha or a pinch of crushed red pepper to the sauce if you want a gentle kick.
What if my sauce is too thick or too thin?
Too thick: add a splash of pineapple juice or water. Too thin: simmer 1 to 2 minutes longer or add a tiny extra slurry.
Final Notes
This sweet and sour chicken is my go-to when I want takeout vibes without the delivery wait. The sauce has that nostalgic tangy-sweet punch, and the double-fry option gives you that crisp bite that makes the whole dish feel restaurant-worthy. It’s a fun one to cook for family nights, casual friends-over dinners, or anytime you need a colorful, mood-lifting plate of food.
If you try it, I’d love to hear how you tweak the balance of sweet and tang to fit your taste. Some people like it brighter and more vinegary, others want extra sweetness, and both are totally valid. Drop a comment with your favorite side pairing or any clever swaps you discover, and feel free to share this recipe with your fellow sweet-and-sour fans.